Recent Food Blog Entries
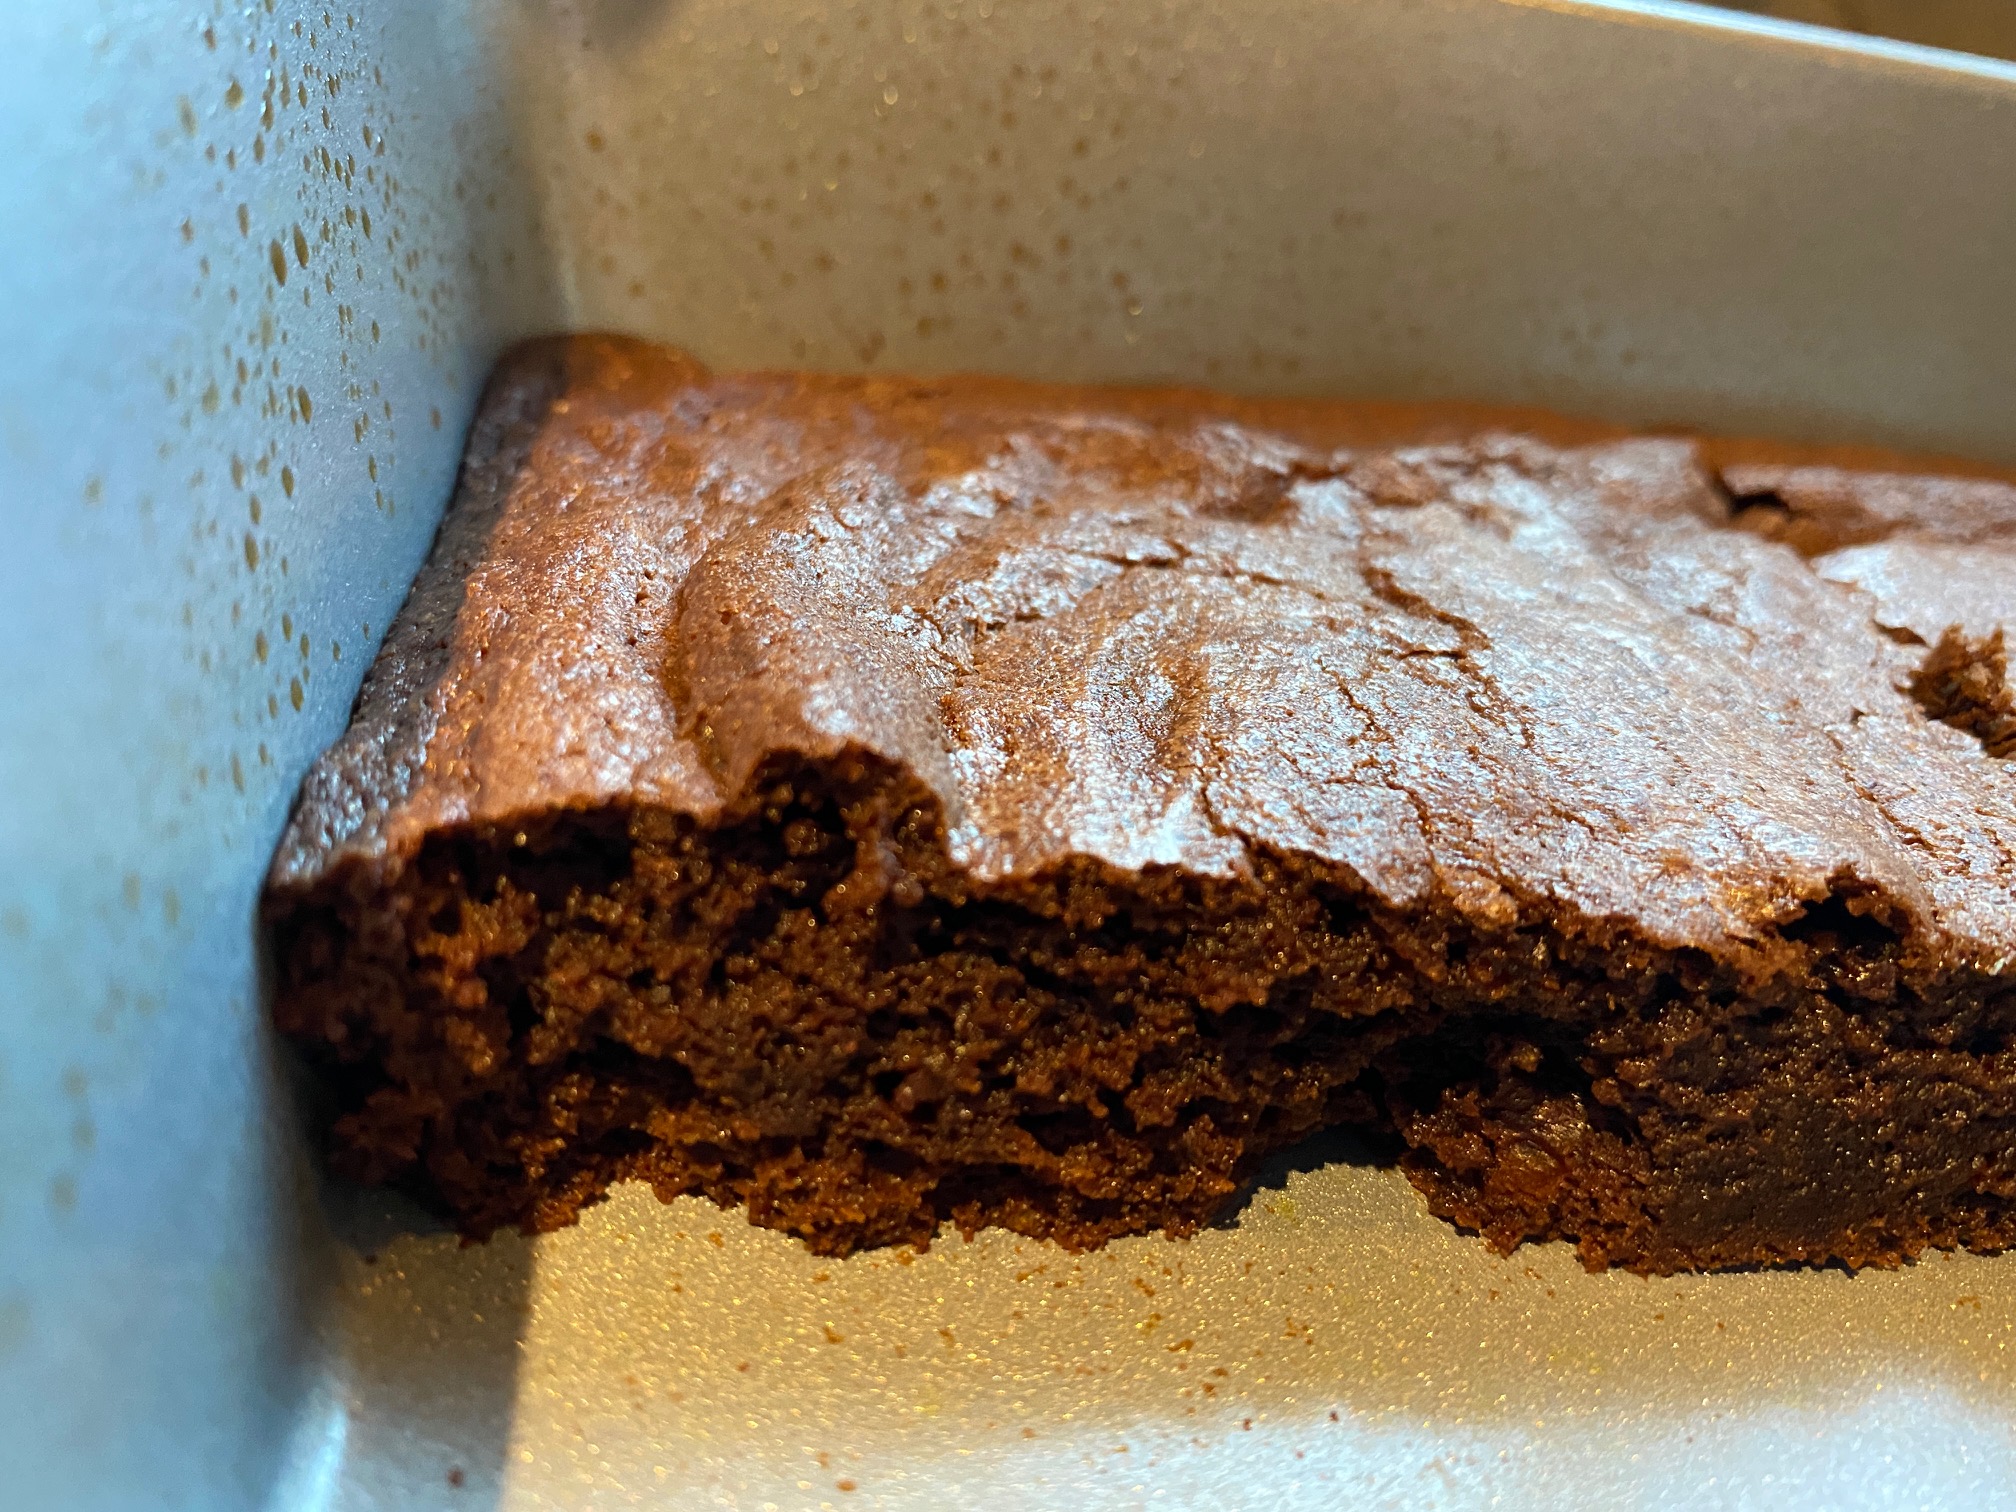
Recipe: Fudgy Brownies (Best ones I've ever had!)
February 14, 2021
I love brownies. Usually I look for a box mix that looks good, make them and call it a day. Today is Valentine's Day. I'm celebrating with the 2 people I love most in this world: My Parents. My mom made us this amazing Prime Rib Dinner that was spectacular and I wanted to make dessert but we didn't have any mixes and so I turned to the internet to see if I could figure out how to make brownies from scratch. I found this recipe and gave it a try and OMG - best brownies I've ever had. Soft and moist and fudgy and oh so chocolate-y!
-
What You'll NEED for brownies:
- 1 cup of unsalted butter (melted and HOT!)
- 2 tablespoons olive oil (coconut oil can be subbed here)
- 2 1/4 cups of sugar
- 4 large eggs
- 4 teaspoons of vanilla
- 1 cup of flour
- 1 cup of unsweetened cocoa powder
- 1/2 teaspoon of salt
-
Optional ADD-Ins (if desired): (I used none of these and they were delicious as is!)
- Chocolate Chunks or chocolate chips; or peanut butter chips
- nuts: walnuts, peanuts, almonds or pecans
- Dried Fruit: cranberries, raisins,
-
Other Supplies that You'll NEED:
- Electric Mixer
- 9x13 baking pan
- Cooking Spray
Pre-heat oven to 350°.
- Lightly grease the 9X13 pan with cooking oil spray; set aside.
- Combined HOT melted butter, oil and sugar together in a medium sized bowl. Whisk well for about 1 minute.
- Add the eggs and vanilla; beat until lighter in color (about 1 more minute)
- Sift in Flour, cocoa powder and salt.
- Gently fold the dry ingredients into the wet ingredients until JUST combined (do NOT over beat as doing so will affect the texture of your brownies).
- Pour batter into prepared pan, smoothing out the top evenly
- Optional: Top with chocolate chunks or chocolate chips; or even caramel would be good;
- Bake at 350° for 20-25 minutes or until the center of the brownies in the pan no longer jiggles and is just set to the touch (the brownies will keep baking in the hot pan out of the oven). If testing with a toothpick, the toothpick should come our DIRTY for fudge-textured brownies.
- Remove and allow to cool to room temperature before slicing. (I didn't wait for room temperature but I did allow them to cool for about 10-15 minutes).
This recipe will make 8 larger brownies or lots of smaller brownies; Very rich so you can certainly cut smaller.
I didn't try freezing these as they didn't last that long --- we had them gone within 2 days.
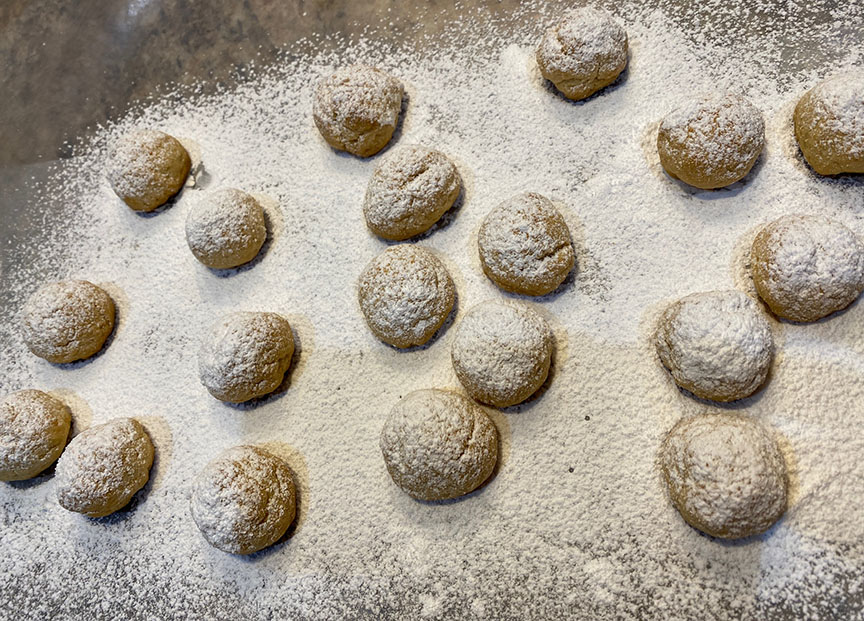
Recipe: Kourabiedes (Greek Butter/Almond Cookies)
December 28, 2020
My dad has always loved this cookie. His sister made some the other day and was showing us over zoom and I could tell how much he wanted one --- so I looked up a recipe and asked him to make them with me. The cookies were great but I enjoyed the morning of making them with my dad even more.
-
What You'll NEED for cookies:
- 2 cups of sweet butter (room temperature)
- 2/3 cup blanched almonds (finely chopped)
- 1/2 cup confectioner's sugar (for batter) and extra for topping
- 2 egg yolks (lightly beaten)
- 1.5-2 ounces of brandy
- 1/3 cup of orange juice
- 1 teaspoon baking powder
- 4.5 cups of flour (sifted)
-
Other Supplies that You'll NEED:
- Electric Mixer
- Baking Sheet(s)
- Wax Paper
Pre-heat oven to 400°.
- Blanche (peel) the almonds (if you didn't buy blanched almonds). Easy way to do this - bring a pot of water to running boil. Put the almonds in for exactly 1 minute (not more and not less). Drain immediately and rinse with cold water. If you squeeze the almonds, the almond should pop out of the shell very easily.
- Cream butter until very light. I used an electric stand mixer for about 10-15 minutes (yes, 10-15 minutes). You want the butter to be almost white and look like whipped cream
- Beat in sugar, egg yolks, almonds, brandy & orange juice.
- Sift Flour and Baking Powder together. Very important to sift.
- Carefully blend the flour/baking powder mixture into the butter mixture.
- Use a tablespoon to scoop out batter. 1 tablespoon of batter rolled into a ball is one cookie.
- Optional: If you have leftover blanched almonds, you can consider hiding an almond inside each cookie (that's what we did!)
- Bake at 400° for 18-20 minutes until light golden brown on top (make sure bottoms don't burn).
- Sift confectioner's sugar onto a large sheet of wax paper.
- When the cookies come out of the oven, carefully place the hot cookies on the wax paper on top of sugar.
- Sift additional sugar over tops and sides (as much as you want/desire)
- Cool thoroughly before storing
This recipe will make approximately 8-10 dozen small cookies.
These are easy to freeze and will keep for up to 6 months.
TO FREEZE: DO NOT coat in sugar. When they come out of the oven, cool them separately. Put them in a freezer safe container. When you want to use them, pull them out of the freezer and bake at 300° just until warm and then sugar them.


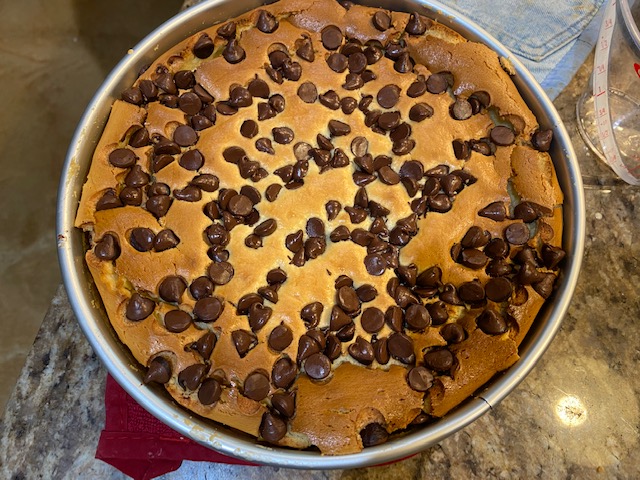
Recipe: Bailey's Irish Cream Chocolate Chip Cheesecake
December 26, 2020
I was super jealous at Thanksgiving because my sister in Florida had made this recipe and it looked so good and since we couldn't be together for the holidays I didn't get any.
She suggested that I make it for Christmas which I vowed to do despite never having made a cheesecake of any kind before. OMG.
This is by far the best cheesecake I think I've ever had and yes, I've had NY Cheesecake before. It is rich and decadent and everything a cheesecake should be.
-
What You'll NEED for crust:
- 1/2 cup toasted pecans (cooled & crushed)
- 2 cups of chocolate oreo cookie crumbs (it's ok to crush with the white filling inside)
- 1/4 cup sugar
- 6 tablespoons of melted butter
-
What You'll NEED for filling:
- 2.25 lbs (36 ounces) of cream cheese (room temperature)
- 1 2/3 cups of sugar
- 5 eggs (room temperature)
- 1 cup Bailey's Original Irish Cream
- 1 Tablespoon of vanilla
- 1 cup of semi-sweet chocolate chips
-
What You'll NEED for Coffee Cream Topping (optional but delicious!):
- 2 cups chilled whipped cream
- 4 tablespoons of sugar
- 2 teaspoons of instant coffee powder
- Optional: Chocolate curls or English Toffee Bits for decoration
-
Other Supplies that You'll NEED:
- 10" Spring Form Pan
- any other oven safe pan to put water in
Pre-heat oven to 325°.
- Mix the crust ingredients into a bowl: melted butter, oreo crumbs, crushed pecans and sugar until well blended.
- Press into the 10"Spring Form pan and up the sides a little. It should be a thick bottom crust.
- Bake just the crust at 325° for 7-10 minutes.
While the crust is baking, mix your filling ingredients together.
- Beat cream cheese with electric mixer until smooth
- Beat sugar in gradually and then add eggs one at a time
- Blend inBailey's and vanilla
- Sprinkle half of chocolate chips over crust.
- Spoon in filling
- Sprinkle the top with the remaining chocolate chips.
- Bake at 325° for approximately 1 hour and 20 minutes or until puffed, springy in center and golden brown. Place a pan of water on the bottom rack of oven while the cheesecake is baking to keep it moist. I checked it at an hour to ensure it wasn't burning but it took 1 hour and 20 minutes. At 1 hour and 20 minutes, my cheesecake looked like a mushroom top in the oven (like it was going to boil over the pan) --- but within a few minutes of removing it from the oven, it had settled down and was fine.
- Cool Cake Completely (overnight is best)
- Beat all ingredients together: whipping cream, instant coffee, and sugar.
- You can either spread over the top of the entire cooled cake and decorate with chocolate curls/toffee bits OR you can put the cream topping on the side for people to add to their own pieces.
This recipe will make approximately 12 good sized pieces of cheesecake. My mom, dad, and I each ate a piece and those 3 pieces took about 1/4 of the cake.
You will enjoy if you like Bailey's and Cheesecake. What could be better?
Recipe: Best Chicken Wings
December 23, 2020
When I was a little girl, one of my favorite meals was a baked potato and chicken wings....but not just any chicken wings...It had to be these special chicken wings...these definitely had a kick but it was so good.
My favorite part of the meal was to take spoonful's of the sauce and pour it over my baked potato. OMG.
My family and I are doing appetizers tomorrow night for dinner so I thought I would share my favorite wing recipe. I usually double the recipe to ensure plenty of great sauce for my baked potato (leftovers)....but it's not necessary.
-
What You'll NEED:
- 2 sticks of butter (melted)
- 1 tablespoons of lemon juice
- 2 Teaspoons of flour
- 1/2-1 Teaspoon of Red pepper
- 1/2-1 Teaspoon of Black pepper
- 2 Teaspoons of Mustard
- 1 clove worth of garlic powder
- 1/2 Teaspoon sugar (or honey)
- 1/2 Teaspoon salt
- 1 cup of Red Wine Vinegar
- Chicken Wings (1 batch of sauce will usually cover 12-15 whole wings (24-30 smaller pieces)
- 9*13 baking pan
- Cooking Spray
Pre-heat oven to 375°.
- Mix the melted butter, lemon juice, flour, red pepper, black pepper, mustard, garlic powder, sugar, and salt together.
- Stir in the Red Wine Vinegar. Mix until well blended.
- Spray the 9*13 baking pan with cooking spray
- Spread the raw chicken wings out in the pan. If they are "whole" chicken wings, it is easier to cut them in 2 when they are raw/cold.
- Pour the sauce over the top of the chicken wings. Make sure to pour sauce over all chicken wings (it won't cover them).
- Bake for 35-45 minutes at 375°. It is best to flip them once about halfway through the cooking time so that both sides are golden brown.
- Serve hot.
My family always served the wings with a baked potato (and the sauce is amazing on a baked potato). Serve however you wish and Enjoy! Tell me what you think! They are not wings that need ranch or bleu cheese to serve with it --- these are great all on their own.
Tip: Leftover Sauce can go great over a baked potato the next day! We're planning on having baked potatoes on Christmas with Prime Rib so you best believe I will be enjoying some wing sauce on my potato.
Recipe: Watergate Salad
December 18, 2020
In preparation for your Christmas holiday meals, I thought I would share another favorite recipe...but this time for something sweet!
My mom's friends Curtis & Sally made this "dessert" salad years ago and it became a family favorite in our household.
Feel free to double the recipe below if you have a large number of people. This will serve about 6 smaller servings. It keeps great in the fridge so don't be afraid of leftovers. You'll want more.
- What You'll NEED:
- 1 9 ounce package of cool whip
- 1 package of Instant Pistachio Pudding Mix
- 1 can of mandarin oranges (drained)
- 1 can of crushed pineapple (NOT-Drained)
- 1 cup of miniature marshmallows.
- optional: 1/2 cup chopped pecans
- Pour all ingredients into a bowl and stir together.
- Put in the refrigerator in a closed container overnight to chill.
Serve and Enjoy!
Recipe: Chaffles
December 13, 2020
Last night my mom tells me she has a new waffle recipe she wants to try. She says it's not really waffles but eggs, cheese, etc. so I was skeptical but said fine.
Think literally a belgian waffle but the batter is made up of eggs, cheese, flour and baking powder. Cooked in a belgian waffle maker (just like a waffle would be). SO it's shaped like a waffle.
As I mixed the ingredients together I thought it was super weird and a weird consistency but it eventually looked like a batter (eggs, flour, baking powder) and then I stirred the cheese in.
Doesn't matter what the batter looked like --- these were so good and will probably be my new favorite breakfast food. They were soooo good and super easy to make! Probably took about 10 minutes total including the 3-5 minutes to pre-heat the waffle maker and about 2 minutes per "Chaffle"
-
What You'll NEED: (Makes approx: 3 belgian sized waffles - you could easily double the recipe.)
- 4 eggs
- 1.5 teaspoons of baking powder
- 1/2 cup of flour (recipe called for almond flour which we didn't have so we used regular and it was fine)
- 2 cups shredded cheese (your choice of cheese)
- Waffle Maker (I used a Waring Pro Belgian Waffle Maker)
- Cooking Spray
Pre-heat waffle maker.
- Crack the eggs into a bowl and beat with a whisk.
- Mix in flour and baking powder until mostly smooth.
- Stir in cheese with a spoon.
- Once the belgian waffle iron is pre-heated, spray with cooking spray.
- Pour/spoon about 1/3 of batter into the middle of the waffle maker and close lid.
- Cook the same amount of time you would cook your waffles (approx 2 minutes in my waffle maker).
- I sprayed the waffle maker each time I cooked one to ensure that they didn't stick.
- Serve hot. Top with your preferred topping or nothing at all. My dad used syrup, my mom used butter, I took mine dry. ALL DELICIOUS!
Serve and Enjoy! Tell me what you think! Totally different than a traditional belgian waffle --- different flavor --- but sooo good.
Recipe: Gluten-Free Cornbread Stuffing
December 1, 2020
In preparation for your Christmas holiday meals, I thought I would share this favorite recipe...
My mom went gluten-free for a short while about 10 years ago. She made this "gluten-free" cornbread stuffing for Thanksgiving and before I tried it I complained to her why we had to be gluten free too and that I wanted real stuffing. She told me to try it and I did and OMG! I've asked her to make it every year since.
I even made it for Thanksgiving in Amarillo one year to take to a potluck and when I say Gluten-free everyone just looked at me funny --- but it was ALL GONE when we left. Everyone loved it. My best friend even loved it and she didn't want to even try it.
- What You'll NEED:
- Loaf of Gluten Free Cornbread (Bob's Red Mill Mix is what I used to make the cornbread)
- Loaf of Gluten Free White Bread (18 ounces)
- 8 tablespoons of Butter
- 1 cup onions chopped
- 4 cups of chicken stock
- 5 eggs beaten
- Salt & Pepper to taste
- Italian Seasonings to taste
- 9X13 baking dish
- Cooking Spray
Pre-heat oven to 350°.
- Cube the GF White Bread & spread on 1 even layer on baking sheet. Toast the cubes at 350° for 8-10 minutes. Let Cool.
- Crumble the cornbread in large bowl.
- Add bread cubes to cornbread and combine thoroughly.
- Pre-heat the oven again but this time to 375°.
- Melt butter in large skillet. Add onions and saute for 7 minutes.
- Put bread mixture in a 9x13 baking dish (sprayed/greased).
- Spread veggies over bread mixture in baking dish.
- Add chicken stock and mix well (in pan).
- Season with salt, pepper, or italian seasonings.
- Add beaten eggs to mix until well incorporated.
- Bake for 35-45 minutes at 375° or until stuffing is set & golden!
Serve and Enjoy! You'll be thanking me - I promise.
Recipe: Creamed Turkey
November 20, 2020
PERFECT for Thanksgiving Leftover Turkey. This is literally my favorite meal ---- it would be the answer to what do I want my last meal to be....it's that good!!!!
Serves 4 people. Cut recipe in 1/2 for only 2 people. Although I will tell you, you will want leftovers, so feel free to make more than you need!
- What You'll NEED:
- 1/2 cup of butter
- 1/2 cup of flour
- 4 cups of evaporated milk
- 2 chopped turkey breasts (leftover bits of turkey from a Thanksgiving Turkey works great!)
- 2 packages of Pepperidge Fram Pastry SHELLS (1 person usually eats 2 shells --- 3 if you are really hungry)
- Salt and Pepper (as desired) - I don't use but others do.
You start by preheating the oven and putting the pastry shells in the pre-heated oven (they take about 20-25 mins to cook). Follow Directions on Package. Oven MUST be pre-heated.
Next you'll be making a basic white cream sauce while the pastry shells cook. If you start at the same time, then the sauce should be ready when the pastries are done.
- Melt 1/2 cup of butter in a pot.
- Slowly stir in 1/2 cup of flour mixing it with the flour so it doesn't burn. You'll end up with a paste in your pan.
- VERY SLOWLY stir in Evaporated Milk (4 cups). You'll want to do this very slowly --- so that it evenly mixes --- otherwise you'll have clumps.
- Simmer over a medium heat. STIRRING CONSTANTLY. You don't want it to burn - so you must stir.
- It will gradually thicken. Once the sauce has thickened, you'll add the chopped turkey.
- Continue to stir for about 5 more minutes to heat the turkey all the way through.
Serve sauce over pastry shells. Garnish as necessary.
Serve and Enjoy!
Recipe: Vegetarian Enchiladas in a Poblano Cream Sauce
October 20, 2020
I got this recipe from my tenant in my rental house. She's a vegetarian and said it was so good. I will definitely be making it again because she was right!!! I added shredded chicken to it since I'm not vegetarian, but I'm sure it would be delicious without the chicken.
Serves 4-5 people (2 enchiladas a piece). You will want leftovers, so don't be fooled into trying to make less!
It does take a lot to prep this dish, but it's totally worth the time in my opinion.
- What You'll NEED:
- 4 poblano peppers
- 1/2 cup of cilantro
- 1/2 cup of heavy cream
- 2 tablespoons of butter
- 1/2 cup of vegetable stock
- 1/2 teaspoon of groound coriander
- 10 taco sized tortillas
- 1 cup of frozen corn (thawed)
- 1 small yellow onion (roughly chopped)
- 1 clove garlic (roughly chopped)
- 1/2 cup of sour cream
- 1 tablespoon of flour
- 4 cups Monterey Jack Cheese (divided)
- 15 ounces canned pino beans (rinsed & drained)
- 1 teaspoon of ground cumin
- 1/4-1/2 cup Cotija Cheese
- OPTIONAL: 3 chicken breasts, shredded
- Prepare the Poblanos.
- How to make the Poblano Cream Sauce
- Assemble the Filling
- Finish off Enchiladas
- Bake Enchiladas in 350° pre-heated oven for 20-25 minutes
• Cut the poblanos in half (or quarters) so that they will lay flat on a baking sheet. Place SKIN up on a baking sheet. Broil until charred (about 5 minutes).
• After removing the peppers from the oven, immediately transfer them to a heat safe bowl and cover with plastic wrap. Let rest for 10 minutes.
• The steaming after the oven helps you easily remove the skins for adding to the sauce.
• After the 10 minutes, peel the skins off the poblanos and discard the skins. The “meat” of the poblano is what you need for the recipe (Don’t worry if there’s a little skin left on them --- it doesn’t have to be perfect).
One thing to note, after the first time I made it, I think I will do 1.5-2 times the ingredient list above to make more sauce. So adding 1 more Poblano pepper and doing more of the cream sauce ingredients to make more sauce (even doubling it) would probably be beneficial as the sauce is delicious and trust me you'll want more.
• Place the roasted poblano peppers, cilantro, onion, garlic, heavy cream and sour cream in a food processor and process until just combined.• Make a Roux: Melt butter in a sauce pan, then add flour. Cook, stirring for 1 minute.
• Add the poblano mixture and cook for a few minutes.
• Add vegetable stock and 1 ½ cups of the Monterrey Jack Cheese. – bring to a bubble and cook, stirring frequently, for 5-10 minutes
• In a large bowl combine beans, corn, 1 cup of monterrey jack cheese, cumin, coriander and ¼ cup of cream sauce
• You can add 2-3 big chicken breasts shredded to this mixture to make them chicken enchiladas --- if you do this, you’ll need to add 1/2-3/4 cup of sauce to mixture (instead of 1/4 cup).
• Make sure filling is covered but it shouldn’t be smothered in sauce.
• Spray/grease baking pan.
• Spoon into flour tortillas, rolling tightly and placing in a 9*13 inch baking dish seam side down
• Top the filled enchiladas with the remaining cream sauce. Use 1.5 cups of Monterrey Jack cheese on top of sauce as well as the crumbled cotija cheese.
Serve and Enjoy!

Recipe: Zucchini & Carrot Fritters
September 20, 2020
My sister found this recipe online and we made it about a month ago and we've made them weekly ever since. They are sooo good and a great side item. It reminds me of a hashbrown patty made out of Zucchini and Carrots.
- What You'll NEED:
- 1 can of chick peas (rinsed & drained)
- 1 large carrot (shredded)
- 1 large zucchini (shredded)
- 2 eggs
- 3/4 cup panko breadcrumbs
- garlic powder, salt & onion powder to season
- oil for pan (our choice was sunflower oil, but you could easily use Olive Oil)
- Shred the carrot and zucchini on a grater like you would shred cheese (short slices). Remove as much excess water as you can from zucchini and carrots (use a cheese cloth or paper towels). Really squeeze out the water.
- You'll need to crush the chickpeas with a fork in the bowl. Make sure they are nice and smashed.
- Mix all ingredients together: chick peas, carrot, zucchini, eggs, and panko.
- Add seasonings of your choice: I sprinkled in garlic powder, onion powder and salt.
- Make patties out of the mixture that are about 1/4-1/2 inch think. Don't have to be perfect. I do this by hand so they vary in size.
- Heat Oil in pan.
- Once oil is hot, then take the patties and pan fry them until they are golden brown on both sides (usually about 3-5 mins per side.) Feel free to flip to ensure they don't burn.
- Enjoy!
If you have leftovers, I have taken the leftovers and baked them in the oven to reheat them and they've turned out great.

Recipe: Clam Dip
June 27, 2020
This is a great appetizer for a party.
- What You'll NEED for the Clam Dip:
- 1 24 ounce carton of cottage cheese
- 1 8 ounce package of cream cheese
- 1 can minced clams (drained almost all the way - leave a little juice)
- A dash of Worchestire Sauce
- Garlic Salt
- Dill
- Mix Cream Cheese & Cottage cheese together.
- Add clams with a little juice from the can.
- Add dash of worchestire sauce.
- Season as desired with garlic salt and dill to taste (I'm heavy on the dill)
- Enjoy!
Make sure you have crackers or chips to use to taste test for the seasonings. If you are gluten free, it's great for dipping veggies too. It's great to serve right away, but I prefer to let it chill in the refrigerator for awhile so it's nice and cold. It would last for days except everyone in our household love to eat it so it never lasts longer than 2-3 days in our fridge.
Recipe: Sausage Balls
April 4, 2020
Comfort food in our family consists of Sausage Balls and Macaroni and Cheese. The Sausage balls we make by hand, but we usually just make boxed macaroni and cheesi (lately I prefer the White Cheddar Boxed Mac that you can get at HEB).
- What You'll NEED for the Sausage Balls:
- 3 cups of Bisquick
- 1 pound of Hot or Mild Sausage (your choice)
- 10 ounces of sharp cheddar cheese
Pre-heat oven to 350°.
- Grate cheese and work into sausage.
- Then work in the bisquick until moist.
- Form into small balls and put on cookie sheet.
- Bake 15 mins in the 350° pre-heated oven.
- Enjoy!
You can easily make and bake these and then freeze them. They stay good for a long time in the freezer and can be reheated in the microwave for a quick and easy dinner.
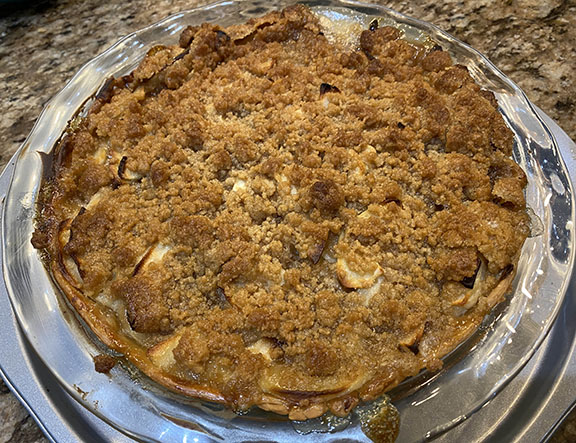
Recipe: Sour Cream Apple Pie
November 20, 2019
Our family always makes a Sour Cream Apple Pie for dessert for Thanksgiving. It's been a staple in our house for as long as I can remember. 1 pie makes about 6-8 slices depending on how you cut the pie. You'll want big slices!
- What You'll NEED:
- 1 pie shell (unbaked)
- 1 cup of Sour Cream
- 3/4 cup of Sugar
- 1 tsp Vanilla
- 1/4 tsp salt
- 2 tablespoons of Flour
- 3-4 cups of green apples (6-8 green apples depending on size)
- 1 egg
- 1/2 cup of brown sugar
- 1/3 cup of flour
- 1/3 cup of butter (cold)
For the Topping:
Pre-heat oven to 400°.
- Peel, core and cut up apples into thin slices. You will want enough apples to pile high in the pie pan as they will cook down.
- In a small bowl, Beat together the sour cream, sugar, vanilla, flour, salt & egg until smooth. Then stir in apples until they are coated in mixture.
- Pour into unbaked pie shell. Be sure to protect the edges of the pie shell with aluminum foil to keep them from burning.
- Bake 25 mins in the 400° pre-heated oven.
- While the pie is in the oven, make the topping. Blend the brown sugar, flour and butter into a crumble with a dough blender. I usually make extra topping with about 1.5 ingredients as everyone loves the brown sugar topping.
- After 25 minutes in oven, remove from oven and sprinkle with the topping. Remove aluminum foil from the edges and Bake for 20 minutes longer.
- Enjoy!
If you want a real treat, eat a slice while it's still warm with vanilla ice cream!!!
Must store the pie in the refrigerator and it will be good for several days.
Recipe: Dad's Favorite Oatmeal Scotchie Cookies
October 2019
Dad usually asks for a double batch - so the recipe below is already doubled. Feel free to half it for a single batch.
- What You'll NEED:
- 2 1/2 cups of all-purpose flour
- 2 tsp baking soda
- 1 tsp salt
- 1 tsp cinnamon (feel free to add a little extra)
- 2 cups butter (4 sticks) softened/melted
- 1 1/2 cups of granulated sugar
- 1 1/2 cups of packed brown sugar
- 2 tsp vanilla (feel free to add a little extra)
- 4 large eggs
- 6 cups quick or old-fashioned oats
- 2 11-oz pkgs of butterscotch morsels (any brand - but I usually use Toll House)
- sheets of parchment paper
- sheets of wax paper or a cooling rack
Pre-heat oven to 375°.
- In a small bowl, combine flour, baking soda, salt and cinnamon.
- In a large mixing bowl, combine melted/softened butter with the sugar, brown sugar, eggs and vanilla.
- Beat in flour mixture slowly into the large mixing bowl.
- Stir in oats and morsels. You can still use the beater for the oats if you have a powerful mixer but NOT the morsels. Hand stir the morsels in.
- Drop small spoonfuls onto parchment paper on cookie sheets. Works best if you smush down the spoonful once on cookie sheet so it's flatter in the middle.
- Bake for 7-8 minutes for chewy cookies or 9-10 for crispy cookies. I find that it makes about 10 trays of a dozen cookies each. The later batches tend to cook faster as the oven is really hot for the later batches -- so watch the time.
- Cool on baking pan for a minute or two before removing to cooling rack or wax paper.
If you want a real treat, eat one while it's still warm!!!
Serve and Enjoy!

Recipe: The Infamous Banana Pudding
September 28, 2019
- What You'll NEED:
- 1 8 oz package of cream cheese
- 1 14 oz can of sweetened condensed milk
- 1 5 oz instant vanilla pudding mix
- 3 cups of COLD milk
- 1 teaspoon (or a little more) Vanilla Extract
- 2 containers of whipped topping (cool whip)
- 1 package of golden oreos
- 4 bananas
Set out cream cheese so it is soft and easy to mix (an hour or so usually works). If you don't have time to let it sit out - DONT microwave. Just beat it cold - it won't get as smooth and you will have lumps but it will still taste good.
In large bowl, beat cream cheese until fluffy. Beat in condensed milk, pudding mix, cold milk and vanilla until smooth.
Fold in 1/2 of 1 container of whipped topping (cool whip).
Line bottom of pan with golden oreos. Arrange sliced bananas evenly over oreos.
Spread pudding and chill OVERNIGHT for best result.
Before serving, add whipped topping to the top (or allow people to add a dollop once served).
Enjoy!
Recipe: Fish Parmesan
August 19, 2019
- What You'll NEED:
- 1/3 cup of light mayo
- 3/4 cup of parmesan cheese
- 1/2 tsp of Chipotle Tobasco sauce
- 2 TBSP Green Onions
- 4 TBSP Lemon Juice
- 6 - 6oz portion of white fish (Tilapia works best)
Pre-heat oven to 425°.
Mix all ingredients except fish together in a bowl. Makes a paste.
In a baking pan, spread out the fish. Spread mixture over each piece of fish evenly.
Bake for 10 minutes. Turn Oven to Broil. Broil for 2-3 minutes or until cheese mixture is a golden brown.
Serve and Enjoy!
More Posts by Date or Category
About Me

I enjoy life by spending quality time with friends and family as often as I can. I'm a foster mom as well as a fur momma to 3 sweet kitties. I love movies, photography, music, TV, food and travel. I'm also teaching myself Portuguese with Duolingo.